Monday, September 26, 2011

Cupcakes with my Gals

Four girls. One Masterpiece. Click to view larger picture


I was browsing through my picture folder and found these 2 gems.

More than half a year ago, on a Saturday afternoon, my girlfriends came over to my place. We're missing one member of the gang, who's holed up at her home 3 1/2 hours away.

It was one afternoon of girly chatter, pizza delivery and lots of laughter.  Followed by the event highlight! Baking double chocolate cupcakes, icing the cupcakes and everyone's favourite part: decorating! My girlfriends are so talented. I know who to call if I need baking assistants. All the cupcakes are their masterpieces.

Whilst they toiled and worked hard, I baked a batch of chocolate marble cheese cake for them to take home.

It was so much fun to forget about all the stress of work and enjoy each other's company, over a chilled out weekend afternoon. When I look at these pictues, I am reminded how blessed I am to have these wonderful girls in my life.

Fun times with my gals

Saturday, December 11, 2010

Mango Mousse & Passionfruit Layer Cake

Life and work has taken a slow toll on me and it's showing on my physical well-being. I've been inflicted with a persistent, antibiotic resistant cough for more than 1 month. It's slowly beginning to take a turn for the better, thank goodness. Enough about ranting now, time to move on to baking!

With all the things going on in my life, I've been baking less than I'd like to. So when Tania requested for Durian cupcakes for her birthday, I wasted no time in agreeing without hesitation.

But, where are the durians??? Are they still plumping their succulent flesh on the tree branch? Seems like the king of fruit was still comtemplating his fate, in hiding! I could not find a single thorny fruit! Plan B was whipped out and the lucky tropical fruit chosen was the delectable mango.

I made a basic vanilla cake, layered it with layers of mango mousse, added fresh passionfruit and fresh chunks of mango. The cake was covered in light whipped cream, coated lightly with roasted pistachos and topped with a sprig of fresh mint. Voila!


At the restaurant, I asked the waiter to put the cake in the chiller. He went ahead to put in in the display cabinet, making it look like one of the cakes for sale. I got a cheap thrill out of it! :) It really dressed up my cake and glammed it up!


The mango mousse and passionfruit worked together really well. The lightness of the whipped cream balanced off with the richness of the vanilla cake. The chilled cake tasted really fresh and yummy.


Mango Mousse
adapted from http://chefwantobe.blogspot.com/2010/06/mango-mousse-cake.html

17g gelatine powder
60g hot water
250ml whipping cream for mousse
3 tbsp icing sugar
1/2 cup fresh mango
1 tsp honey

Instructions:
1. mix whip cream & icing sugar. Whip until mousse stage.
2. Save 100ml for topping.
3. Dissolve gelatine in hot water. stir well.
4. Puree fresh mango with honey.
5. Mix gelatin mixture to pureed mango. Stir well. Mix to 150 ml whipped cream.
6. Chill until ready to use.

Sunday, August 8, 2010

Cheddar Chive Biscuits

I've not been baking for 2 weeks! Was itching to bake this weekend. It was a Sunday afternoon where I craved some rest and relax time after a particularly hectic week. Naturally my thoughts drifted to baking and I found myself wandering into the kitchen in the late evening.

I've been wanting to try the Cheese and Chive biscuits I saw from the Williams-Sonoma baking book for a while now. The ingredients sound healthy (very little butter and no sugar!), best of all, it looked yummy!

It was not difficult to prepare at all. Although I do need a pastry cutter pronto! the "2 knifes" tactic was painful for my wrists after a while and it took ages to get the mixture to resemble "coarse crumbs".

Alas, all' s well that ends well (feeling slightly Shakespeare-ish. Hm I wonder if they had Cheddar Chive biscuits or scones in the 1500s). Snap back to the current day. lol. I added a little extra cheese since the cheese I used was not super strong cheddar. I also cut the dough into tiny circles, slightly bigger than a 50 sen coin.

The results:


Like how a biscuit should be, it was crispy on the outside. Inside, it was slightly moist and doughy. Not too dry overall. The cheese smelt divine and the chives gave the biscuit a savoury flavour.

I popped one into my mouth warm and fresh from the oven. It reminded me of the Chive and Onion biscuits I recently bought near my office as a tea time snack. Hm... now where did the onion relation come in. It must have been the chive taste, which is slightly herby.


Would I make this again? YES in a heartbeat. It would go well with creamy soups or even a hot cup of tea.


Cheddar Chive Biscuits
from Williams-Sonoma baking

Ingredients:
315 g flour
2 1/2 tsp baking powder
1/2 tsp salt (can be omitted as cheddar cheese is slightly salty)
60 g finely shredded extra-sharp Cheddar cheese
10 g minced fresh chives
90 g butter, unsalted, cold and cut into cubes
180 ml milk

Instructions:
1. Line a rimless baking sheet with parchment paper.

2. In a large bowl, stir together the flour, baking powder, salt, cheese and chives. Using a pastry blender or 2 knives, cut in the butter until the mixture forms coarse crumbs about the size of peas. Add milk to the dry ingredients and using a rubber spatula, stir until just evenly moistened.

3. Turn out the dough onto a lightly floured work surface and press together gently Knead the dough about 6 times and form into a ball. Pat into a circle about 2cm thick. Using a floured biscuit cutter, cut out rounds and place them on the sheet, spacing about 1 inch apart. Gather the scraps, pat out again and cut more biscuits. Bake until biscuits are golden brown, about 15-18 minutes.

Makes 12 (if using the recommended 7.5 cm cutter)
I used the smaller cutter and got a good 20+ biscuits

Review: San Terri Green Tea Chiffon Cake

I love San Terri's Green Tea cake.

The first recipe in this blog was the Green Tea cake by San Terri, as published in Flavours magazine. It did not turn out exactly like the cake in the shop, especially the cream. I may have missed something or used an ingredient which was not of adequate quality. The recipe remains to be retested.

There is a little San Terri shop in Menara Hap Seng in KL, an isalnd of a shop with no walls, very near my office. One day after lunch I dropped by and saw a new cake! the Green Tea Chiffon Cake.

Basically the same base cake as the Green Tea cake, but without the cream filling. With added adzuki beans in the cake itself.

I bought the whole cake. It set me back only RM 6.50. Compared to one slice which was about RM 5.


As I would expect from normal chiffon cakes, the cake is not moist on its own. It is dry, airy, light with a subtle taste of green tea that hits your palate about 3-4 bites into the cake. The adzuki beans were not too soft, slightly hard and provides texture with a nice crunch.

It is the perfect companion for a morning / afternoon cup of tea and one slice is never enough!

My Ratings

Presentation: 4/10
Texture: 6/10
Taste: 5.5/10
Price: 8/10 (in terms of affordability)

Recommended: Only for the avid green tea fan.

Check out San Terri's website here for location and other products.

Saturday, July 24, 2010

Review: Bisou Cupcake

Was having dinner at KLCC a fortnight ago and saw Bisou's little cupcake shop. It was a little island beside the centre court. No walls, open concept.

Business was brisk!
I looked around the cupcakes on offer, they were all so colourful.
It took me a while to decide which to get. Although there were many cupcakes, they were basically play arounds of classic tastes.

For example, vanilla cupcake with vanilla frosting (I'll call it vanilla on vanilla for ease of reference). They also have vanilla on chocolate; chocolate on vanilla; chocolate on chocolate; vanilla on chocolate ganache; chocolate on chocolate ganache; coffee on coffee; chocolate on coffee; vanilla on nutella; chocolate on nutella; vanilla on lemon etc. You get the idea. It seems a lot, but essentially, there are only 2 base flavours and about 8 frostings.

I opted for Candied Lemon, which turned out to be cupcake of the month!
It came in a real pretty box. At RM 5 a piece, it was affordable.


The cupcake was regular sized and looked very pretty.
I took a bite into the frosting and cake.

The flavours were not overwhelming, just the right hint of citrusy taste with a hint of sourness. The cake is dense and moist, in a good way. It was not too airy, and had the right amount of sweetness.


The frosting is buttercream, which essentially is butter + a lot of icing sugar.
Personally I have a slight aversion to buttercream. It usually is too sweet and the icing sugar gives a crunchy, almost sandy texture. There is no way to lessen the sugar unfortunately, because lesser sugar will make the frosting less firm and more prone to melt or not hold its shape.

My choice of frosting is Swiss Meringue Buttercream, consisting mainly of egg whites and very little sugar and butter. It holds its shape perfectly for piping and does not melt in humid weather. If you refer to my earlier post on Jenny's wedding, that was the frosting I used for the wedding cupcakes and everyone complimented on its taste. It was my mild dislike to buttercream that prompted me to search for an alternative which has the same properties as buttercream. SMB is the perfect choice and partner for a cupcake, in my humble opinion.

Anyway, back to the Citrus Lemon cupcake. There was a hidden surprise, a piece of candied citrus fruit (could be an orange / lemon) between the cup cake and the frosting, which was sweet and sour at the same time, an intense taste to say the least.

By the time I'd reach half the cupcake, I was on a mild sugar high! It would take me quite a while to finish the cupcake on my own, due to the intensity of the sweetness that comes after the 3rd or 4th bite.

It did satisfy my sweet craving and I was happy to have a little piece of dessert on a Friday night!

Check out Bisou's website here for more flavours.


My Ratings

Presentation: 6/10
Texture: 5.5/10
Taste: 6/10
Price: 8/10
Recommended: Yes, if you have a moderate to high sweet tooth

Photo credits: Taken with Mr O's Blackberry. Mr O also shared the cupcake.

Sunday, July 4, 2010

The Anzac Biscuit


According to Wikipedia, the origins of the Anzac biscuit can be traced to "WWI, around 1914–15. While some believe the biscuits were first made by the troops in the trenches with provisions they had at hand to relieve the boredom of their battle rations, the most widely accepted belief is that the biscuits were created by Australian and New Zealand women endeavouring to create a treat for their loved ones that would survive the long journey to the front."

More interestingly, the article pointed that ANZAC is a term solely for use by the government. A term not usable in commerce, not open to intellectual property exploitation rights. One of those rare occasions where my work and hobby collide!

According to Wikipedia, "the term ANZAC is protected under Australian law and therefore the word should not be used without permission from the Minister for Veterans' Affairs; misuse can be legally enforced particularly for commercial purposes. Likewise similar restrictions on naming are enshrined in New Zealand law where the Governor General can elect to enforce naming legislation. There is a general exemption granted for ANZAC Biscuits, as long as these biscuits remain basically true to the original recipe and are both referred to and sold as ANZAC Biscuits and never as cookies.

This restriction resulted in the Subway chain of restaurants dropping the biscuit from their menu in September, 2008. After being ordered by the Department of Veteran's Affairs to bake the biscuits according to the original recipe, Subway decided not to continue to offer the biscuit, as they found that their supplier was unable to develop a cost-effective means of duplicating the recipe."

So there...We'd have to call it a BISCUIT, unless you're feeling particularly bold one fine day to break the law and call it a COOKIE..

Lucky too that it is not a protectable geographical origin by virtue of being protected by government, if it were, any cookie not made in Australia and NZ would not be able to name itself "ANZAC", a la "champagne vs sparkling wine".

Alright, enough about IP law... the biscuits are beckoning.

The cookie was easy enough to make, no mixer is needed. I've had Anzac biscuits in Australia but wondered how the homemade version will fare as compared to it's commercialized cousin. The outcome is... homemade is truly the best.

One unconventional step was to dissolve 1/2 tsp of baking soda with 1 tbsp of boiling water, and pouring it into the melted butter and honey mixture. The mixture bubbled and foamed, it was amazing to watch, like dropping an effervescent tablet into a cup of water.


Butter, honey, oats, coconut in a cookie, you can't go wrong with that combination of ingredients. Just typing it makes me salivate and feel hungry at the thought of these delicious yummies.

Once I bit into the warm biscuit out of the oven, I silently thought how lucky the WW1 soldiers were. If I were a soldier, these will be the epitome of hope and all that home represents, its scent, taste and simplicity. It would have been many a soldier's only link to their warm and comfortable home in 1914. Stories like these adds a whole dimension to baking and enjoying the end product, like we're allowed a glimpse into the past, a little reminder of how good our life is now!

Don't hesitate! Try it, it's easy and very fulfilling!


Anzac Biscuit
Makes 26

Ingredients:
125 g plain flour
120 g brown sugar
100 g rolled oats
90 g dessicated coconut (I used freshly shaved coconut)
90 g organic honey
125 g butter
1/2 tsp baking soda
1 tbsp boiling water

Instructions:
1. Greast a baking tray and preheat oven at 180C.
2. Sift flour in large bowl, add sugar, rolled oats and dessicated coconut. Form a well in the middle of the bowl.
3. Melt butter and honey over low heat. Remove once combined and melted.
4. Dissolve 1/2 tsp baking soda in 1 tbsp boiling water. Pour the mixture into the butter mixture, the mixture will foam. Immediately pour into dry ingredients.
5. Use wooden spoon and mix till combined.
6. Scoop 1 tbsp amounts and drop on baking tray. Flatten slightly. Allow room for spreading.
7. Bake for 10-15 minutes or until the biscuits turn golden brown.
8. Cool on wire rack and enjoy!

Sunday, June 27, 2010

Lemon Buttermilk Bars

It is about time baked something apart from cupcakes.

I still love cupcakes, however it cannot be the only thing I bake all the time ;)

I've always been intrigued by lemon bars, having read them constantly in baking blogs from America / Canada.

Then one night during my pre-bedtime reading ritual, I stumbled upon a book I bought a year ago, Williams-Sonoma's baking "FoodMadeFast" which is the perfect book for baking for the part time baker with a tight schedule. The book is separated into 3 sections - 30 minutes from start to finish; 15 minutes hands-on time; Make more to store! Just select the recipe that suits your time frame and off you go. It's a brilliant book!

So coincidentally lemon buttermilk bars were featured suddenly all the lights came on in my head. This is absolutely the recipe to try this weekend, bonus point being that it supposedly takes only 15 minutes to make!

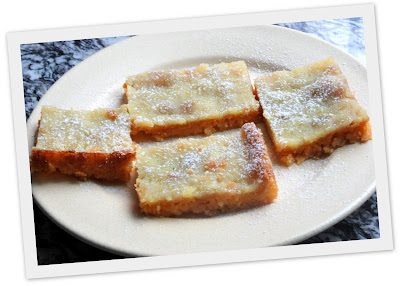
So how was my first attempt at bars? Frankly, more difficult than I thought! The pastry needed to be baked beforehand and cooled totally before pouring the lemon buttermilk filling and to bake for a further 15-20 minutes.

The results:


It took longer than 15 minutes in the kitchen, and to be fair the recipe did say it is 15 minutes hands-on time, excluding preparation work. Still, it was a pretty quick recipe to make. I'm beginning to love the sour sweet combination of flavours. Watch this space, I'll definitely be making more lemon bars in the future.


Lemon Buttermilk Bars
from Williams-Sonoma baking

Ingredients:
Unsalted butter 90g at room temperature
Granulated sugar - 60g plus 155g
Flour - 90g plus 2 tbsp
Salt - 1/2 tsp
2 eggs
1 tbsp finely grated lemon zest
Lemon juice - 80ml
Buttermilk - 125ml
Icing sugar for dusting

Instructions:
Crust
1. Preheat oven to 180C. Butter bottom and sides of 8 inch square pan
2. In a large bowl, use electric mixer on medium speed, beat together butter and 60g granulated sugar until creamy. Add 90g flour and salt and mix on low speed until blended.
3. Spoon the dough into pan and press evenly in pan bottom. Bake for 15-18 minutes until golden brown.


Filling

4. In a large bowl, use electric mixer on medium speed, beat eggs and 155g sugar until blended. Add 2 tbsp flour, lemon zest and juice, buttermilk and beat until smooth.
5. Pour into baked crust and bake for 20-25 minutes, until top of filling is set.
6. Let it cool completely in pan and cut into bars. Dust top with icing sugar.